Humans have a natural avoidance of pain. And it’s no different in trading.
Most traders fear losses more than they enjoy their wins.
After trading for 20+ years and teaching thousands of students how to profit in any market, I can tell you one thing with certainty…
No one can avoid taking losses in the market.
Losers are just as much a part of trading as winners.
What puts my millionaire students above the rest is how they handle losses.
They’re masters at recognizing patterns and can quickly determine when a setup has failed or is ready to go. And it’s that skill that allows them to bail on failed trades before things get too bad.
However, it’s one thing to talk about it. It’s another to SHOW it…
Which is why I want to dig into my Brookmount Explorations Inc. (OTC: BMXI) trade.
Although the chart formed a great pattern, I ended up taking a loss on the trade.
But from this loss, there are a couple of great lessons here that can help you reduce losses in the future.
The Background
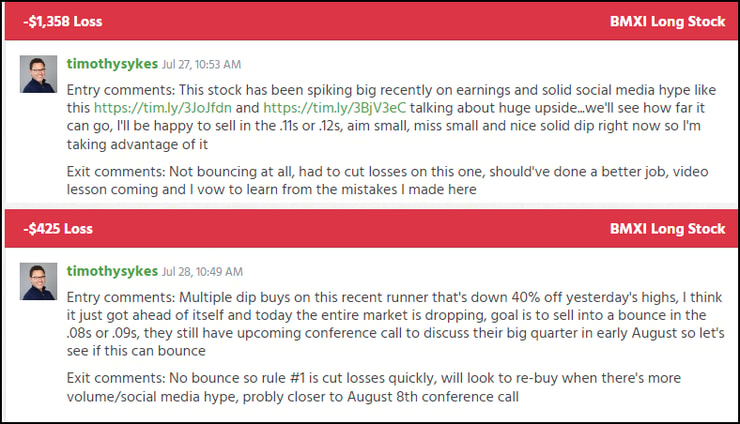
Before I dive in, I want to note that I took two trades in BMXI.
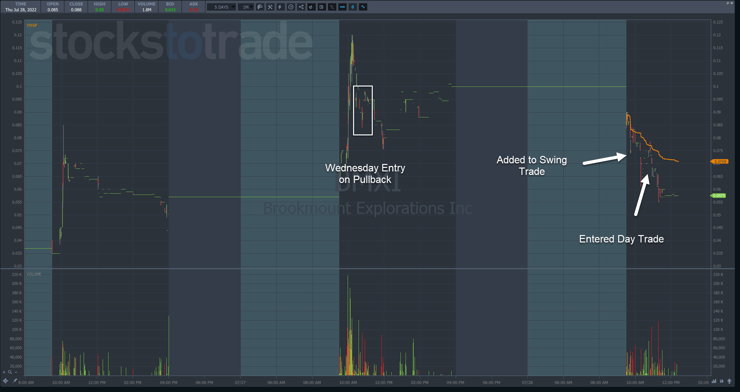
One was an overnight swing trade (top), while the other was a day trade (bottom).
Let’s start with the pattern I saw in the chart.
Like any other major news event, earnings can act as a stock catalyst.
However, the earnings need to be solid. A lot of times, promoters will pump a stock’s earnings when they’re actually garbage, which I avoid.
Additionally, I don’t typically jump in on the first day. I give it a day or two to see how shares react.
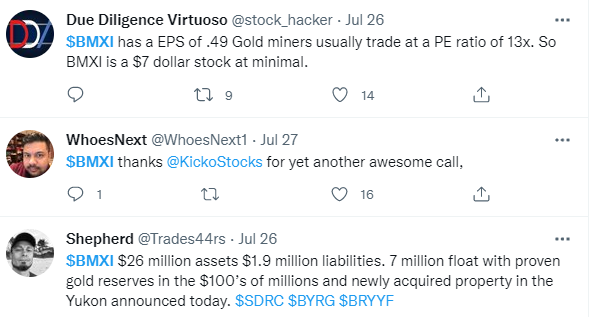
As I noted in the top comment box, there was decent social media chatter, with one tweet below calling for the stock to go to $7.00.
The Setup
Let’s start with the swing trade first.
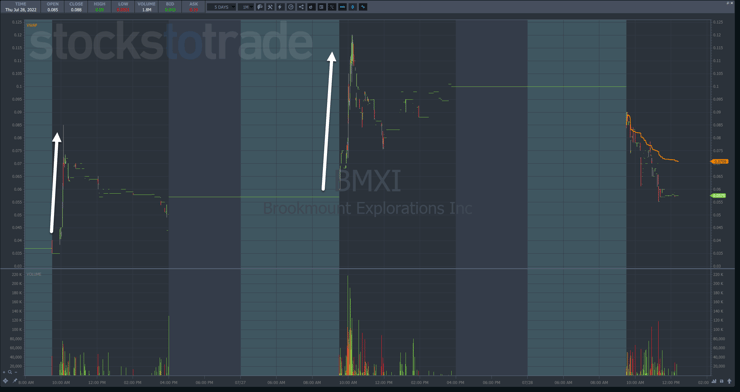
Ideally, I wanted to see the stock continue its push higher into the third day.
However, it’s important to look at the broader market context.
At the start of 2022, stocks pulled a lot of one-and-done days. They’d start strong and fade into the close or on the second day.
It’s only been recent that I’ve seen multi-day runners. And as I noted in yesterday’s article, I can see this type of price action continuing for the next several weeks.
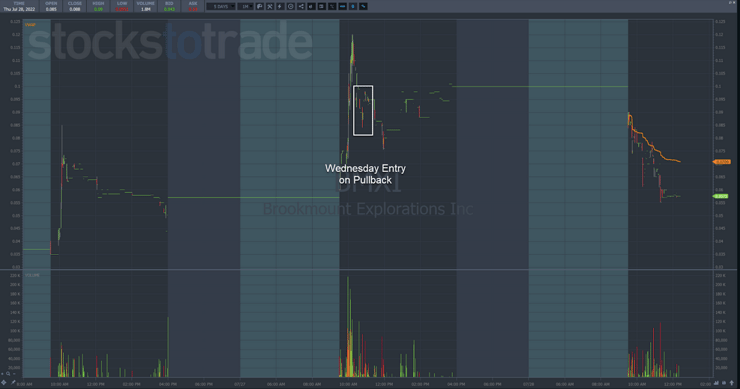
I like to enter these trades on a dip, which is how I got into the trade on Wednesday.
I got in at $0.09 and was looking for a move to $0.11-$0.12 with 25,000 shares.
The stock closed around $0.10.
Thursday, shares opened up around $0.09 and then quickly pulled back.
For day trades, this is a great setup for a morning panic dip buy that can snap back in the other direction.
So, I did two things.
First, I added 45,000 shares to my swing trade position at $0.075 for a total of 70,000 shares and an average price of around $0.08.
Second, I entered a new day trade with roughly 65,000 shares at $0.0725.
Unfortunately, the stock failed to produce another bounce.
Instead, it drifted lower.
Sticking with my #1 rule, I cut both positions for a loss.
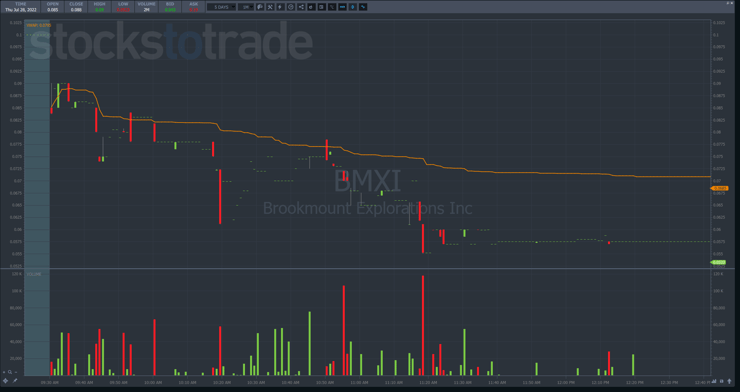
Let’s take a look at the one-minute chart from Thursday and walk through what I saw.
For the most part, shares did what I would expect from a panic dip buy – they moved lower on increasing volume.
Shares initially made a low around 10:20 a.m. and then bounced for the next 30 minutes.
I expected that bounce to continue.
Instead, the stock immediately faded from VWAP and did so on increasing volume.
That’s a sign of heavy selling pressure.
Rather than hold and hope, I dropped both positions quickly.
Typically, when I buy into a dip, I want to see the stock bounce immediately. I consider the setup failed not only if the stock drops but if it trades sideways.
Watching the price action and level 2 data for buy areas helps me identify the best prices to jump in, where I can lean against a wall of buyers to stop a stock’s slide.
More Breaking News
- CDE Stock Rallies As New Gold Deal Reshapes Outlook
- BTG Stock Dips As Sector Sentiment Softens On Downgrades
- GCTS Rises As GCT Semiconductor Draws Trader Attention
- VEEV Surges As S&P 500 Inclusion Triggers 10% Spike
That’s why I can walk away from many of my trades with a small profit even if they don’t work out.
Final Thoughts
I teach my students to recognize these patterns so they can tell whether a setup is playing out correctly or failing when they look at the price action.
The faster they can assess that, the better they get at managing their losses.
–Tim


Leave a reply